Showing posts with label crafts. Show all posts

Monday, May 16, 2016

How to Party Plan Like a Pro // If You Feed Them, They Will Come

I just love random, little holidays...such as Cinco de Mayo! It is actually surprisingly difficult to decorate for without buying a million aztecy/southwesterny printed things. But I found a couple of bright and colorful Cinco de Mayo weddings and that game me a little inspiration.


So, the central goal of this party was to feed people. Being that there was a large group...and it needed to be Mexican food of some sort, I opted to make "carnitas" and give people the option to do nachos or tacos. My friend Blair (co-worker, marathon runner, expert dinner-maker) had made this delectable spicy shredded pork for me before, so I knew that's what I had to do. Unfortunately, mine didn't turn out as good. Her's was soooo flavorful and mine was like, eh. So, my recommendation for this recipe is to go crazy on the rub - you can't have too much.  


Then I set up all kinds of toppings: cilantro, sour cream, queso fresco, jalapenos, limes and salas, as well as some queso dip going on in the mini crockpot. People said nice things about it, but like I said...I was disappointed with the pork.


 And in the other ring! I had my Uncle Steve's famous margaritas going on. They were hit and super easy to make and manage. Along with the blending station were limes, sweet/sour salt and little lime drink markers I doodles and printed.

Uncle Steve's Marg Mix

Ingredients:

  • 1 can - frozen lime concentrate
  • 3/4 can - tequila
  • 1/4 can - triple sec
  • 1 Tbsp - powdered sugar
  • Lots of ice  

 Directions for Marg Mix:

  1. Empty one can of frozen lime concentrate into a blender.
  2. Fill the same can from the concentrate 3/4 with tequila and add to blender.
  3. Fill the same can from the concentrate 1/4 with tripel sec and add to blender.
  4. Add 1 Tbsp powdered sugar and blend.
  5. **This can be made prior to and refrigerated until needed for marg making.
Directions for Margs:
  1. Fill the blender or Magic Bullet container 1/4 way with marg mix.
  2. Fill the rest of the container with ice.
  3. Blend and enjoy.


To better incorporate my wall gallery into the shenanigans, I doodled and printed little word bubbles of Cinco de Mayo puns...


I did a ton of prep work for this party (I basically only host parties to force myself to do the really deep house cleaning), but for once I was totally ready before the start time. So, I could actually enjoy a little quality marg time on the patio before any guests arrived.

Oh! And the invites! I doodles those too, so that's kind of fun...


Monday, February 29, 2016

2016 Rootin' Tootin' Chili Cook-Off

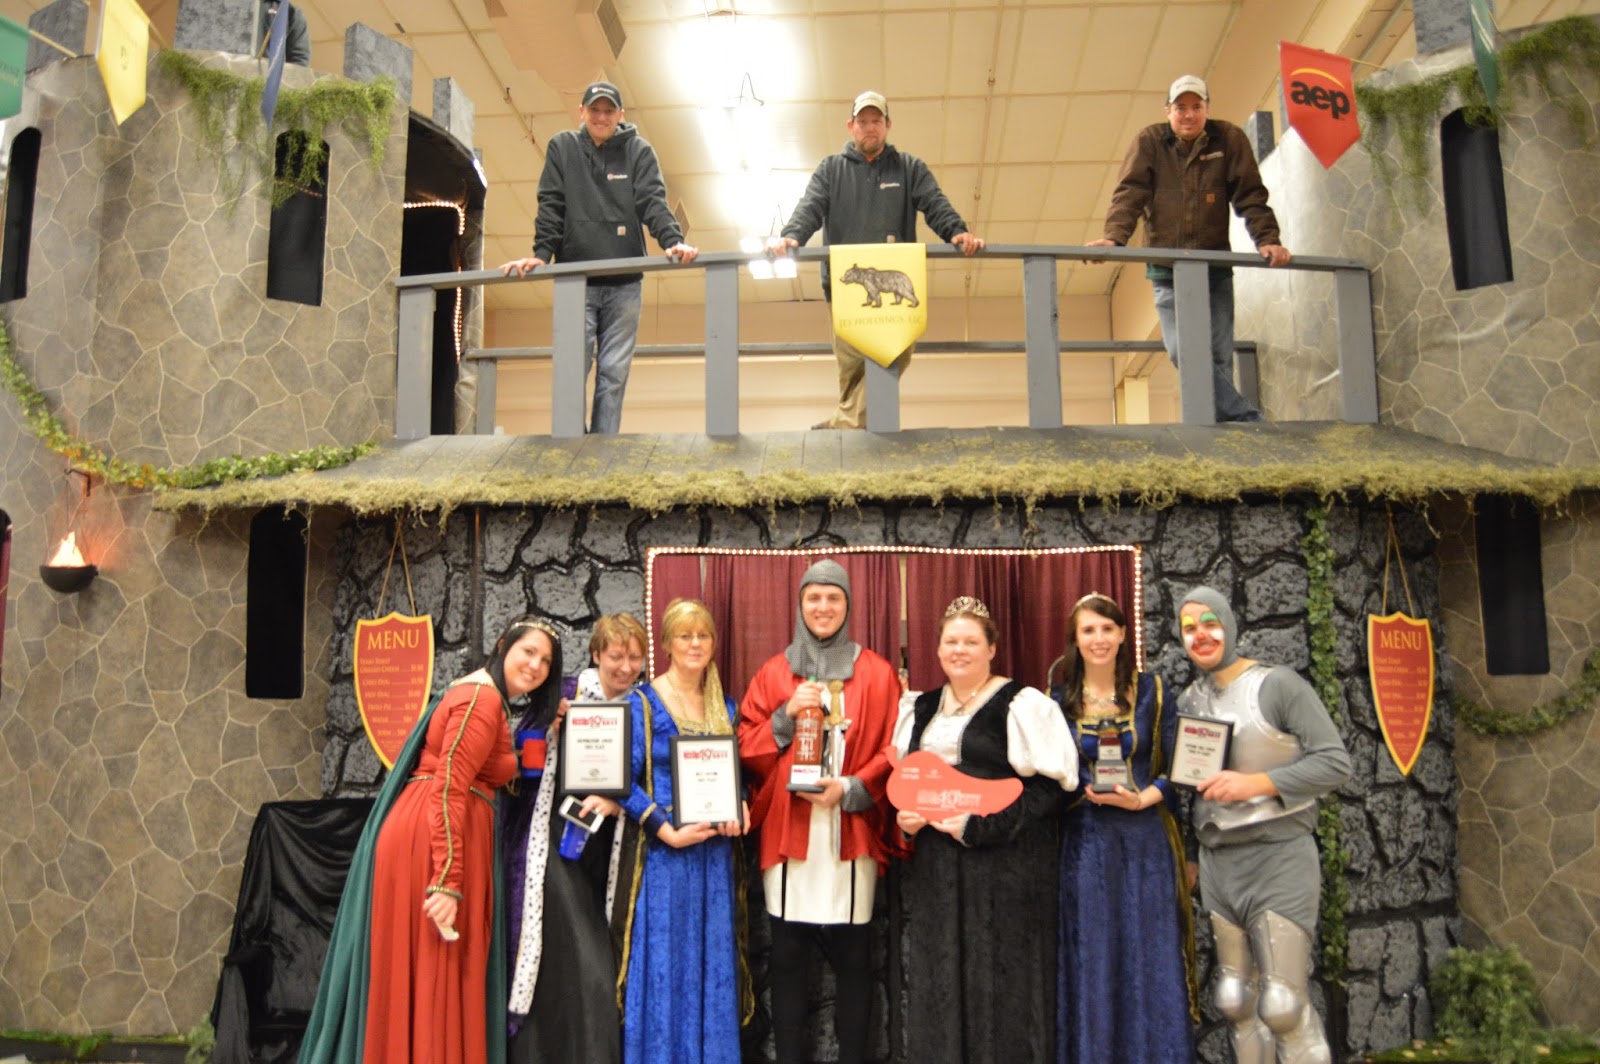
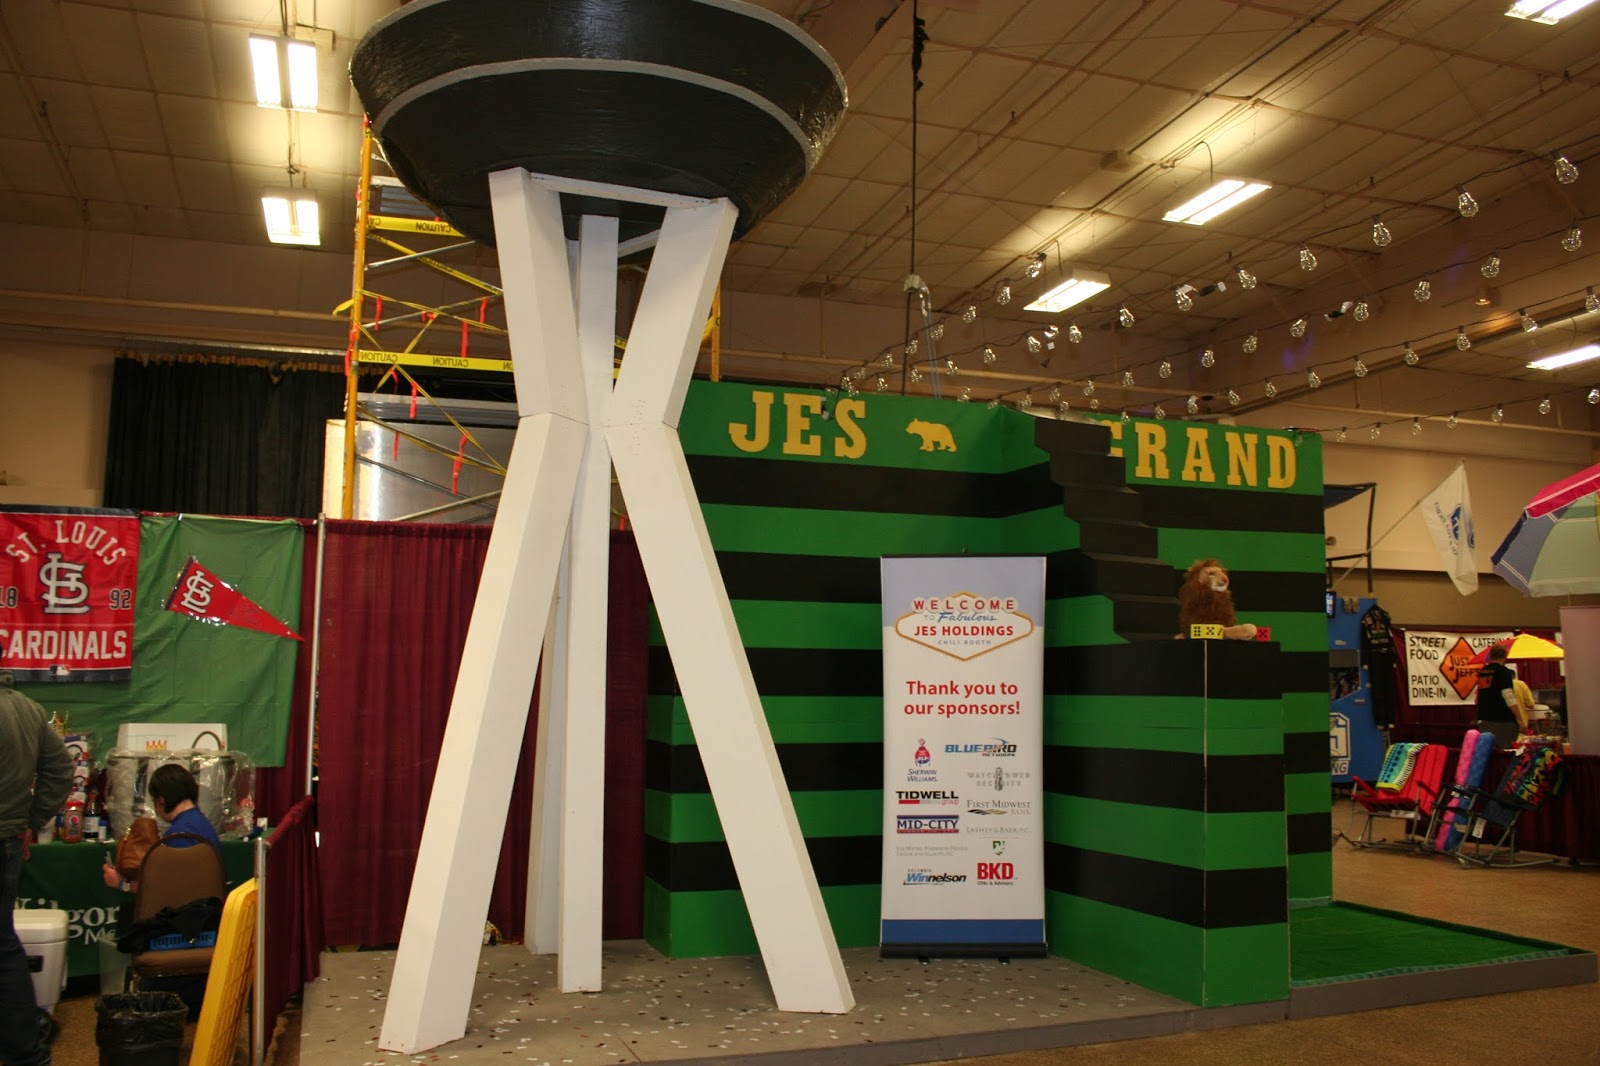
Every year, JES Holdings goes completely over the top in constructing (I do mean constructing) our chili booth. We have a construction company that we recruit for the job and every year it just keeps getting bigger and bigger. Here is a little history of our booth since I started with the company...

2013: Red Hot Chili Preppers


2014: Chiligan's Island


2015: Kings, Queens & Chili Beans


2016: Welcome to Fabulous JES Holdings


Please notice the Welcome to Fabulous Las Vegas sign, because that baby is my pride and joy. It was a fun time, as always, and we took home first place in Best Costume, Best Booth and Biggest Bowl (most money raised). There's a lot of prep work that goes into this event and it's pretty rewarding to see it completed and praised at the event.

Tuesday, December 8, 2015

Little Gold Dress to Grown-up Gold Skirt

In college, I wore this little gold, sequins dress...


I mean, even for college, that is dangerously short.

Now, here I am...a GROWN-UP, a PROFESSIONAL, an ADULT and I just can't be seen in a dress that tiny and that shiny. But, I can be seen in a reasonably long skirt that shiny! As long as I don't spend any money in procuring it (as is the goal this month). So, a craft was born.

Here's how I like to start my crafts: 
1. Make a list of materials needed.
2. Get materials.
3. Just...do it.

So, I made a list of materials and realized that all the scissors in this house are shit. I walked right into Hobby Lobby (bought like 40 other things) and asked an employee for the best scissors. These, he said, they use "like all time around here." If they're good enough of Hobby Lobby--they are good enough for ME!

Here's where we started: tiny, shiny dress...scissors and elastic (from my Holiday Party 2014 tulle skirt)


Then, thanks to my ultra awesome scissors--I cut RIGHT through two layers of sequins fabric like it was water!


At this point...I realized, I have no idea what I'm doing. I found this YouTube video, which was very helpful and the craft moved onward.


And it was going GREAT, until like 95% of the way done when my bobbin ran out. SHEESH. I have failed and failed and failed to put in a new bobbin, time after time. So, I found another YouTube video--with actually just photos, but still very helpful 'cause I NAILED IT.

Just like that, it was all done. JUST LOOK AT IT. I can't believe it turned out this well?! I even tried it on (sorry, no pics) and it fit nicely! I don't want to bring down my crafty reputation, but I did not think this was going to turn out well.


Look at this great crop top/sports bra I also got out of the deal?! Whaaaaaa...


Stay tuned because I've got some super cute outfit ideas (that I probably don't have anywhere to wear) that I will definitely hopefully blog about later. Either way, the outfit for Holiday Party 2015 is totally taken care of...well, the skirt is. At least.

Saturday, October 31, 2015

Happy Halloween from Jurassic Park & The Scooby Gang!

This works out nicely because all my costuming took place on the day before Halloween, so I can actually do a post of the outfits on the day of...

Our office costume of Jurassic Park was almost too obvious. We had obsessed over Jurassic World and while we hadn't really started planning the costume until a couple of weeks ago, I think it was in our hearts to be those characters all along. Unfortunately for us (fortunately for him), Mark was on vacation in Hawaii this week, so he missed out on the fun...unless you consider vacationing to a beautiful island and seeing the actual location where Jurassic Park was filmed "fun." Ha.


The Scooby Gang was also a last minute decision when Zak and Jordan's out-of-town plans were canceled and we kicked it into party mode. Being a redhead, I have a running list of all the costumes that really put my ginger locks to use. Daphne is always a classic, since I have actually already dressed as her when I was like...HELP, mom...thirteen? So, the idea pops into my head and I quickly realize that, JINKIES! (I know that's Velma's line) we have all the makings of a perfect Scooby Gang!

Scooby Gang = (Tall, Blond Male) + (Sexy Ginger) +
(Nerdy, Short-Haired Brunette) + (Scraggly, Unkempt Person)


Quick costume cost breakdown here, because we finalized all these purchases Friday after work at Goodwill and Walmart:

Daphne: shoes - owned, dress - borrowed, panty hose - $1.50, scarf - $0.50, headband - $1.50, scooby snacks - crafted
TOTAL - $3.50
Shaggy: shoes - owned, (corduroy) pants - $3.00, shirt - $3.00, Scooby - $1.00 + crafted
TOTAL - $7.00
Velma: shoes - owned, socks - $2.50, skirt - borrowed, turtleneck - $3.00, glasses - borrowed
TOTAL - $5.50
Fred: shoes - owned, jeans - owned, shirts - owned, ascot - $2.00
TOTAL - $2.00

By the way, I've got a little Katy vs. Kait: Who Wore it Best? in the works for the Daphne costume. So keep an eye out for that!


Wednesday, October 28, 2015

Super Easy Emoji Costumes

So, Halloween is two days away. Being the costume lover that I am, I have about four solid costume ideas when this week started and am pretty certain I could've pulled them all off. However, I decided to channel all my costume creativity into a blog post of costume you could create with all things you probably already have around the house. What's more, these ideas can double as a group costume, because they're all emojis. Ok, let's get to it...

Perhaps you remember my office costume last year...pink-shirt, sassy emoji girl. She's a good pick because you can really tell her story, ya know. Materials: pink shirt, scissors


Or maybe give the ol' awkward running man a try? Materials: red shirt, jeans, strong right quad muscles


Take a twist on the standard ghost-from-bed-sheet and go emoji-ghost-from-bed-sheet. I would've liked to try it with a little slit in the mouth for an actual tongue...but this seemed safer. This one requires a little DIY, but I think you're up to it! Materials: white bed sheet (or even pillow case), scissors, sharpie marker (black and pink), white shirt


Let's give inanimate objects a fair trial here, too. What about this cute option as the present? Materials: goldish shirt, long red ribbon


Or, there's probably like a 70/30 chance your graduation cap was black...in which case. DONE. Materials: graduation cap


Finally, it's we can't forget the new guys. Who's happy to see this injured little guy added to our emoji faces line-up? Until now, we've been summarizing all ailments with that dumb surgical mask face. Now we can feel a more physical pain through emojis!! Materials: remainders of your white bed sheet or white t-shirt


Happy Halloween everyone! I hope your weekend is waaay better than the wounded emoji face I'm making in the picture above...

Wednesday, November 5, 2014

Dresser Dreaming

Shortly after moving into the new house, I bought this lovely dresser on Craigs List.


It's beautiful. I love it...but I've been dreaming about a little dresser accessorizing lately and wanted to make a plan.


Frames // BUY
Frames are the one thing you should never buy from a store. Every garage sale or thrift store I've ever been to has some old frames. So, I'm looking for two, mismatching frames. Not necessarily the ones shown here, but something similar. I think I would like the framed work to be kind of artsy - not photos for this space.

Vase // BUY
And easy Hobby Lobby purchase...have you seen their glassware selection? And if you time it right, it's 50% off a good part of the year.

Small Jars // DIY
I suffer from an obsessive need to collect jars. Every empty salsa, pasta, pickle, pizza sauce jar is washed, the label removed and it stored away on my shelves. The DIYing of this will be the lids. The lids are colorful with branding on them, as expected, so I'll need some kind of fun solution to make the pretty. The jars will be used for storage of earrings...probably.

Mirror // BUY
It must be a circular mirror. I'm not sure why, but I've just got my heart set on one. I've always been a little hesitant (terrified) to buy a mirror, since they seem so bizarrely expensive. But I want a nice one, so I'm building up my nerve to drop the dough. I would like to to be silver or gray and fairly large, about 24" in diameter.

Large Jar // OWN
This larger, candy jar was purchased from the glorious Hobby Lobby glassware selection. I use it to store all my bracelets and would love to have it up, off the top of the dresser (where it is now). 

Shelf // BUY
A floating shelf, of course. Is there any other kind? I'm a little concerned about the depth of the shelf, since the jar is pretty large. But I would like it to be short and white.

Hooks // DIY
Now. These may be tricky. I've been flirting with my options for necklace storage/display for a while now and have determined I want something light and simple. I came across these cool hooks from Anthropolgie, which were, of course, a million dollars. I think I could do something like this. Some silver, stylish knobs affixed to a circular wood pieces and then screwed into the wall...? I recently came across this version of the same idea with a really simple tutorial. Kinda makes me want to wander around Menards and come up with my own spin on the idea!

Dresser// OWN
Got it. Love it. But I'm thinking I might also give the drawers a little organizational make-over as well...what do we think of this?


I was inspired by this jewelry drawer from Very Fond Of on the left. I like her idea to use an egg carton (or ice tray) for earring organization. And the small cups/glasses for hair accessories. I'm a little unsure of whole process as far as building in the dividers...but again, I'll probably have to get some help from a certain handy man (boyfriend) I can contract for some side work.