Showing posts with label home. Show all posts

Monday, May 16, 2016

How to Party Plan Like a Pro // If You Feed Them, They Will Come

I just love random, little holidays...such as Cinco de Mayo! It is actually surprisingly difficult to decorate for without buying a million aztecy/southwesterny printed things. But I found a couple of bright and colorful Cinco de Mayo weddings and that game me a little inspiration.


So, the central goal of this party was to feed people. Being that there was a large group...and it needed to be Mexican food of some sort, I opted to make "carnitas" and give people the option to do nachos or tacos. My friend Blair (co-worker, marathon runner, expert dinner-maker) had made this delectable spicy shredded pork for me before, so I knew that's what I had to do. Unfortunately, mine didn't turn out as good. Her's was soooo flavorful and mine was like, eh. So, my recommendation for this recipe is to go crazy on the rub - you can't have too much.  


Then I set up all kinds of toppings: cilantro, sour cream, queso fresco, jalapenos, limes and salas, as well as some queso dip going on in the mini crockpot. People said nice things about it, but like I said...I was disappointed with the pork.


 And in the other ring! I had my Uncle Steve's famous margaritas going on. They were hit and super easy to make and manage. Along with the blending station were limes, sweet/sour salt and little lime drink markers I doodles and printed.

Uncle Steve's Marg Mix

Ingredients:

  • 1 can - frozen lime concentrate
  • 3/4 can - tequila
  • 1/4 can - triple sec
  • 1 Tbsp - powdered sugar
  • Lots of ice  

 Directions for Marg Mix:

  1. Empty one can of frozen lime concentrate into a blender.
  2. Fill the same can from the concentrate 3/4 with tequila and add to blender.
  3. Fill the same can from the concentrate 1/4 with tripel sec and add to blender.
  4. Add 1 Tbsp powdered sugar and blend.
  5. **This can be made prior to and refrigerated until needed for marg making.
Directions for Margs:
  1. Fill the blender or Magic Bullet container 1/4 way with marg mix.
  2. Fill the rest of the container with ice.
  3. Blend and enjoy.


To better incorporate my wall gallery into the shenanigans, I doodled and printed little word bubbles of Cinco de Mayo puns...


I did a ton of prep work for this party (I basically only host parties to force myself to do the really deep house cleaning), but for once I was totally ready before the start time. So, I could actually enjoy a little quality marg time on the patio before any guests arrived.

Oh! And the invites! I doodles those too, so that's kind of fun...


Thursday, May 12, 2016

How Does Your Garden Grow?

Perhaps you recall the last time I made you read about my gardening endeavors? The grass was all patchy, nothing was growing, I was holding a hand cultivator* like a weapon? Anyway...spring came along with rain and warmer weather, and it's made QUITE an improvement!


Obviously, I have plans to plant something here...just not quite sure what yet. I'm hoping I can split off a little of something I already have, but we'll see. 


Look how much better the grass looks! Still a bit patchy, but it's a pretty shady spot...so I'm trying to be patient. 


I'm thinking once I lay mulch we can hide that gutter drain a bit better.  


Look at those little purple guys!


And the peony bush is about to take off...come on, little peony! You can do it!


Last year, these azaleas didn't even pretend like they were gonna bloom. Now look at them - peaking out bright and early to see what the spring's all about.

That's all I wanted to say really. Next steps are to fill in with more plants and mulch the place! It will look nice and neat once I've got the mulch in, but I'm trying to take this whole thing very slow and right now there's so much weed-plucking that I don't have the patience to put deal with mulch quite yet. Any garden wisdom? Advice for a novice? Mistakes I'm making?

*I had to look it up, but yeah...that's what it's called.

Monday, March 14, 2016

Slowly Going Green

Yes - I recycle*, but that's not what this is about. No, it's nothing to do with St. Patrick's Day, I just happened to time this post perfectly with the greenest week of the year.

Since moving into Kait's on Cannon Court, I've enlisted my Nana to help with my landscaping. Last Easter, I had the whole family in town for a big landscaping escape. Ever since, I've been bootstrapping my way to manageable motherflippin' landscaping.

Daylight Savings Time ended yesterday and the weather was right on queue to give a sunny, warm day with an extra hour of beautiful daylight. To celebrate - I gardened! Nana's instructions--because know next to nothing--was to do some housekeeping lawnkeeping. Which means, get rid of the dead stuff (leaves and expired plant parts) and the incoming grass and weeds.

This post is not for showing off. Someday (I hope) we'll look back at these pictures and just laugh at how scappy and sad my landscaping looks right now. The goals for this year are:

  1. Plant more plants: not a whole expensive jungle, just a couple at a time.
  2. MULCH: Nana says I don't need it, but I can't stand it with just this rocky dirt anymore!
  3. More watering: I'm kind of a lazy waterer when it comes to the keep my thirsty plants hydrated...oops.
Aaaaand here we go, NO JUDGING.


(Above) You can see how thin the grass looks here. This used to be a horrible paver patio that didn't make any sense at all in the front. Part of the landscapades included pulling them up and putting down dirt (it was sand and gravel under the pavers). 


(Above) Here was have an awkward little corner where the gutter pipe just wants to come out and play...stupid gutter pipe.


Like I said, this is a progression post, so there is a lot to improve upon before it's a proud post. But I'll keep you updated!

*In Columbia, the city provides you a voucher for free recycling bags, you only have to sort out the cardboard (everything else today) and they pick it right up with your trash. You would have to be an asshole not to recycle.

Sunday, December 13, 2015

Katy vs. Kait: Deck the Halls

Yayyyy for Christmas!! It's almost here: glowing Christmas trees (all over Instagram), pine-scented candles (with a couple glasses of wine in the bath) and friends gathered 'round (pigging out over a cheese platter).

Let's have a little throw back to my early decorating days with a Katy vs. Kait, shall we?


Awwwwh. Isn't that cute? I wish I could have found a larger package of lights, but I guess they have really got product packaging down here in 2015. Anyway, here is what I did with my lights and decorations.


So, I did all my little decorations (on a budget, if you'll remember), which is just the entryway, the tree, the table and the wild little tree in the guestroom. It's for all the ornaments I have and love that don't match my pretty tree...sheesh. Not too much actually, but it's my little Christmas world and I like it.


Tuesday, November 3, 2015

The Quick Clean Checklist

It's a Wednesday night and you seriously want to partake in the Imo's BOGO special, but you really need another couple to justify two X-Large pizzas. So, last minute plans are made and you've got just a couple of hours before company comes over to join you in Imo's goodness and probably need to use your bathroom. But when did you last clean your bathroom...?


Time is limited, but the checklist below is prioritized. So start at the top and work your way down through what you can with the time you have. Good luck, you little host(ess), you.

1. Light a Candle
First and foremost, light a candle. One in your main, hosting space and another in the bathroom. If this is a last-minute, over-night guest, you better get a candle going in the guestroom too. 

2. Close Idle Rooms
It's simple enough, if you won't be using the room...shut the door. Problem solved, one less room to clean.

2. Tidy-up a Bit
Starting with the space in which you will mostly be hosting, just start picking-up. Fluff and arrange throw pillows how you like, put away the mail on the table, any dirty dishes should be in the dishwasher, shoes in your room (not by the door), etc. etc. Don't forget your outside patio or porch!

3. Clean the Toilet
No matter what kind of last-minute even you're hosting, the worst thing you can have is a disgusting toilet. Take the bowl cleanser and squirt along the inside of the bowl. Scrub the bowl with your toilet brush and then let the cleanser sit until the toilet is used. Do a quick dust of the toilet surfaces and then a basic surface cleaner and paper towel job around the outside. 

4. Bathroom Counters + Mirror
Watermarks and grimy faucet edges can really make a bathroom look grosser than it is. Using the same surface cleaner and paper towels, clean the counters and mirror as needed. If you've still got tough grime on the faucet edges, a little water and old toothbrush will do a fine temporary job until you can get some Comet in on a deeper clean job.

(If guests are staying over-night, a quick shower rinse should be done as well. It's not ideal, but if you can just give the edges and shelves a rinse so there isn't hair or grit anywhere...that would be nice. When you knock out everything else on the list, the next item would be a good Comet scrub along the tub or shower base.)

5. Wipe Kitchen Counters
Crumbs accumulate so quickly, ya know? Just take a wet hand towel and wipe the kitchen counters as best you can. Be sure to wipe any watermarks around the sink too. Don't forget the kitchen table!

6. Surface Dust
Dust isn't usually too noticeable...unless you haven't dusted in a really long time. Just try to hit those really obvious areas: TV and TV stand, shelves, books, frames, etc. 

7. Sweep + Swiffer
Bathroom first, then kitchen. I am not sure if you have a Swiffer, but I highly recommend them as a quick-fix for floors. I usually only sweep and Swiffer anyways, with a serious hands-and-knees scrub about every three months. 

8. Vacuum 
Again, start in the main, hosting space. Then hit the hallways and, if needed, the guestroom. Then put the vacuum away...you would hate to be seated next to your vacuum and all it's corded glory over dinner.

Hopefully your last minute plans are well worth the quick clean, but if they aren't...well at least you actually cleaned-up a bit for once this week.


Wednesday, November 5, 2014

Dresser Dreaming

Shortly after moving into the new house, I bought this lovely dresser on Craigs List.


It's beautiful. I love it...but I've been dreaming about a little dresser accessorizing lately and wanted to make a plan.


Frames // BUY
Frames are the one thing you should never buy from a store. Every garage sale or thrift store I've ever been to has some old frames. So, I'm looking for two, mismatching frames. Not necessarily the ones shown here, but something similar. I think I would like the framed work to be kind of artsy - not photos for this space.

Vase // BUY
And easy Hobby Lobby purchase...have you seen their glassware selection? And if you time it right, it's 50% off a good part of the year.

Small Jars // DIY
I suffer from an obsessive need to collect jars. Every empty salsa, pasta, pickle, pizza sauce jar is washed, the label removed and it stored away on my shelves. The DIYing of this will be the lids. The lids are colorful with branding on them, as expected, so I'll need some kind of fun solution to make the pretty. The jars will be used for storage of earrings...probably.

Mirror // BUY
It must be a circular mirror. I'm not sure why, but I've just got my heart set on one. I've always been a little hesitant (terrified) to buy a mirror, since they seem so bizarrely expensive. But I want a nice one, so I'm building up my nerve to drop the dough. I would like to to be silver or gray and fairly large, about 24" in diameter.

Large Jar // OWN
This larger, candy jar was purchased from the glorious Hobby Lobby glassware selection. I use it to store all my bracelets and would love to have it up, off the top of the dresser (where it is now). 

Shelf // BUY
A floating shelf, of course. Is there any other kind? I'm a little concerned about the depth of the shelf, since the jar is pretty large. But I would like it to be short and white.

Hooks // DIY
Now. These may be tricky. I've been flirting with my options for necklace storage/display for a while now and have determined I want something light and simple. I came across these cool hooks from Anthropolgie, which were, of course, a million dollars. I think I could do something like this. Some silver, stylish knobs affixed to a circular wood pieces and then screwed into the wall...? I recently came across this version of the same idea with a really simple tutorial. Kinda makes me want to wander around Menards and come up with my own spin on the idea!

Dresser// OWN
Got it. Love it. But I'm thinking I might also give the drawers a little organizational make-over as well...what do we think of this?


I was inspired by this jewelry drawer from Very Fond Of on the left. I like her idea to use an egg carton (or ice tray) for earring organization. And the small cups/glasses for hair accessories. I'm a little unsure of whole process as far as building in the dividers...but again, I'll probably have to get some help from a certain handy man (boyfriend) I can contract for some side work.

Wednesday, September 17, 2014

The Post-Pool Project, Part 1: #thepit

Once upon a time, there was a pool.


Kaitlin spent a long, hot summer trying to care for the pool. She turned the filter on each morning and off each evening. She learned not to buy diluted shocker and applied the shocker to the pool once a week. She monitored the pH levels to make sure the chemicals were balanced. And once, just once, she got in the pool...

...so she neglected the pool, resulting in the growth of a thick, nasty layer of green algae, which had to be scrubbed off and drained and scrubbed some more until finally it was clean. And the pool went down. Then the pool went up, on Craigs List...where the pool sold for $200! Which provided a little start-up money for the Post-Pool Project, for which I recruited Aaron's help. The Post-Pool Project would be a paver-patio with stone firepit, perfect for the quickly approaching fall season.


First Step: Remove the stupid foam pieces to prepare the patio site. I don't know why the previous owners chose to use these foam squares as the flooring for their pool space, but it did not work very well. So, we moved them all and cleaned them off and are planning to post them to Craigs List as well.


Second Step: Measure and mark-off the area. Now, we did actually take a first-and-a-half step, which was to choose our pavers. This was important to do before measuring, so we could ensure we would mark a space that would fit an even number of pavers. Otherwise, we would've had to cut the stone shorter, which would have been a real pain. The beautiful Belgium Reversible pavers we chose were a variety of shapes, five of which could be combined to make 15 x 15" squares. We decided on creating a 12 x 12-paver space and calculated an extra 2.5" on each edge for the retaining wall/edging. So, we measured and marked-off a 15.5 x 15.5" area.


Third Step: Remove 6" of dirt from the patio space. This was the worst step of all. We calculated later that we removed 4 TONS of dirt...it took 5 hours and was probably the most exhausted my body has been since high school sports. We dug the dirt and piled it on tarps around the area. Which consequently led us to our next problem...what do we do with all this dirt?


Fourth Step: Dispose of the dirt. There are a some options here:
  • Post dirt to Craigs List (people will take free dirt, who knew?)
  • If available, dump in secluded area of land (which is what my dad could have done)
  • Hide around yard in places that need leveling
Obviously, we "hid" the dirt, which is not very pretty now, but does set the yard up nicely for some spring landscaping! This took another full day of filling our borrowed wheelbarrow (thank you Taylor!) with loads of dirt and dispersing them in various areas of the yard. Then raking them out and hand-stamping them down.

Now, we had a little break. Who would've though the week days could be considered a break? We needed the materials to be delivered, which costs $60, so we wanted to buy all the materials at once. We took some time debating quantities and finally came up with these numbers:

Paver Base (gravel) = 50 bags
Leveling Sand = 50 bags
Stone = 720 blocks of various shapes and colors


Fifth Step: Receive delivery of materials. The materials pulled up to our little neighborhood on THIS. The bed of the truck was unlatched from the cab and the cab doubled as a forklift, which then removed the four pallets of supplies to our driveway. It was unreal. 


Sixth Step: Transport and lay paver base in sections. Aaron carried wheelbarrow after wheelbarrow of paver base up the slope to the backyard while I poured out the bags and spread them within the sections we marked. We leveled out the final area, with a slight slope (so water will drain a bit without just settling) and hand-stamped the area. 

Now in the normal pit-to-patio process, the next break would be here. It would pick back up with laying the leveling sand and then the stone. But we had a bit of a situation: it was supposed to rain tomorrow. While we thought there was probably enough time to lay the sand, we didn't think we could get the stones down before tomorrow and didn't want the sand exposed to the rain. So, with daylight hours to burn, we started the process of moving the remaining sand and stone up the slope to the backyard.


Seventh Step: Haul your materials (in 50+ trips) to the patio site. I cannot praise Aaron enough for this job...I helped move and remove the stones from the wheelbarrow, but he made every trip of base, sand and stone up the hill to the pit. I would have died...and it would have taken me twice the number of trips.


So, this is where #thepit is now: paver base laid, and materials standing by for the time (and weather) when we can finish this sucker up. It has been an eye-opening, exhausting, not-yet-rewarding experience, but I am still optimistic about the finished product! It's been incredibly helpful working with Aaron to push me through the digging blisters and raking backaches...I would even go as far as to say it's been really fun!

Stay tuned for The Post-Pool Project, Part 2! And keep your fingers crossed for us...


Wednesday, March 19, 2014

#househunt

Once upon a time, a post-grad professional looked at her rent check and said, "This is ridiculous, I'm practically lighting $350 on fire every month!" And so it began.

At first, I planted the idea in my mom's head, who said, "That's nice, but can you afford a down payment?" Great question, mom. It's time to start saving! So, now I have a goal to be saving for. No thank you Hyvee, I'm shoppin' at Aldi! Get outta here you black dress shoes, three pair of black shoes are more than enough!

And then I wrecked my car...into two cars, which was less than awesome.

After a weekend of hating myself, I get a phone call from my Nana, that dear, sweet Nana of mine. Nana explains how my mom relayed the news of car accident and shattered dreams, to which Nana tells me she is so proud that I wanted to buy a house. HUH, I think. My Nana, a retired Queen of Real Estate, says she thinks investing in Columbia property is a wonderful idea and wants to support me.

I start crying. It was a stressful few days.

And the adventure begins. I come up with a price range for which I think I can afford a mortgage payment and discuss with Nana & Bob *. Nana offers to loan me the money I'll need for a down payment and start seeking out good agents in Columbia. She sets me up with REMAX's Clete Baxter. I fervently search the web, looking at house after house until I've put together a list of what I think are my best options. There's about four inches of snow on the ground the first time I meet with Clete and we see seven houses that day.

* Bob is my real grandpa. When I (the first grandchild on my mom's side, was born) Bob declared, "I'm too young to be a grandpa! You can call me Uncle Bob." And that was that.

Clete is a talker, to say the least. The first time we go out, it's a little overwhelming...he kind of seems to know a lot and I have no idea what I'm doing. But I learn. And we go out to look at houses again, and I learn a little more. I pretty quickly realize that I don't like ranch-style homes. They may be a little newer than a split-level home or a home with a walk-out basement, but I'd rather have an older home. While the south side of town would be wonderful, I realize that's not in my budget.

Finally I find a house I think I can work with. Later, when Nana sees it, she says it's got "sweat equity." But mom's sees it first...and she is not pleased. It's hard to evaluate houses on a budget. You've got what you think and what your mom says and the pressure from your grandparents and the vagueness of your agent (that's their job, they can't tell you if a house is a yes or no). But, like all fairy tales...when you know you know.

Cannon Court was just another house on the list. We squeezed it in at the last minute and as I walked through the house, I felt the tickling in my stomach that this was it. Clete and I started talking about how soon Nana and Bob could come to see it and how fast we could write a contract. There was some pretty scary pressure with the approach of what they call in the real estate world, "the spring market," a rush of spring-drunk sellers and buyers making everything a little more competitive. Houses I've been wanting to see go under contract before I can ask off work to see them! I'm feeling a little nervous and if Nana give the ok, I want to make sure this happens.

Nana comes to Columbia the next day. We look at the "sweat equity" house--she likes it, we look at the cute house with character--she doesn't like it and then we look at Cannon Court. We're walking through the house and she's asking questions. I still remember the moment: she walks down to the basement and I follow her so that's it's just the two of us. She turns to me, smiling and says, "Kait, this is the one." We hug and make happy girl noises.

Then we get down to business. The contract writing is all a lot of craziness...how many days to secure the loan, what amenities do we want to ask for, when is my current lease up, oh yeah...and price. I cannot tell you enough how lucky I am to have Nana on my team. And this was only the beginning. Finally we get the contract written and sent to the seller's agent.

I don't want to get my hopes up, but I'm pretty excited. An hour later, Clete texts me, "They want to move us the closing date?" The negotiations begin. Between Nana and Clete, I am in great hands. We go back and forth just once the next day, when at 12:53 p.m. Clete texts that we've got a verbal commitment and I sign the final contract that night!

I know you don't want to here about the big loan decision that's been underway for days since, so let's get down to the pictures! Ladies and Gentlemen, Cannon Court...

So, as you can see, she's a split level.
With a large, lovely tree in the front!

TWO car garage!

Front little patio and Nana's already volunteered her
gardening skills and patio furniture!

The back deck and the second tree.

Haha, strangely enough, it has an above-ground pool.
Should make for a fun first summer!

Shed in the back for extra storage.

Living room, with a nice bright window.

Living room opens to the dining room. To the right is...

...the kitchen. All appliances included and MATCHING.
Side-by-side refrigerator. AND a deep freezer in the garage.

Master bed. One of the bigger I've seen in my search.
The other two bedrooms aren't pictured.

The only downside is that it's 1.5 bath. But the upstairs bath has two sinks.
And I'm gonna say the half is remodelable?

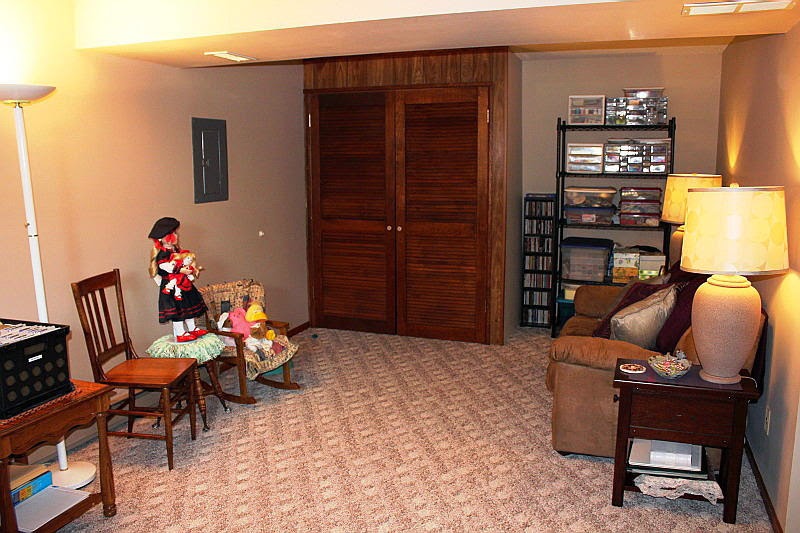
Back end of the basement, with a little (craft) closet.

The front end of the basement.

And the kicker, it comes with the washer and dryer...FRONT LOAD.
If I wasn't a grown up before, I sure am now.